
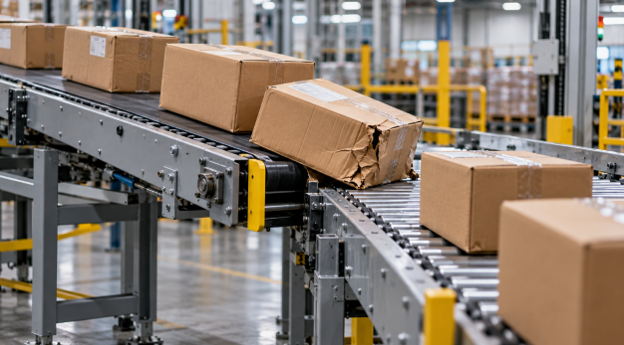
Product gets damaged at conveyor transfer points because that is where it stops being carried and gets handed off. For a moment, the load is partly on one conveyor and partly on the next, and the two are rarely doing the same thing.
One is faster. One sits a little higher. The upstream line keeps pushing while the downstream one is still clearing.
Fixing the damage means controlling that moment: when the load arrives, how it is supported, and what is behind it. Each has a physical cause that can be found on the floor and a design answer that belongs in the specification.
Speed Mismatch Between Two Conveyor Surfaces
A load that lands on a surface moving at a different speed has to accelerate or decelerate, and friction between the two surfaces does that work. Until the speeds match, the underside slides. A carton shows it as a scuffed bottom panel, while a stacked pallet shows it as upper layers leaning after the base has already changed speed.
A right-angle transfer asks more of the load. Its forward speed has to be gone before it moves sideways, and whatever speed remains is absorbed by the side guide or end stop. Most corner damage on pallets and totes originates at that contact.
The design answer is a controlled arrival. MDR drives and stops each zone independently, which lets the load be decelerated in the zone ahead of the transfer. On a CDLR conveyor, the chain turns every roller through its own sprocket, so a heavy pallet reaches the stop at the same speed on every cycle.
With that repeatability, a stop and a transfer can be adjusted once and left alone. Our automotive pallet handling project ran 650 lb pallets at 140 FPM on twin-run MDR with turntables built into the line. At those speeds, the way a pallet decelerates belongs on the layout from the first drawing.
Keeping the Load Supported Across the Gap
Between any two conveyors, there is a gap; and for a short distance, the leading edge of the product hangs over it unsupported. A common rule of thumb is to always keep three rollers under the product. The shortest item on the line is the one that tests it.
Short or soft-bottomed loads dip into the gap and strike the first roller of the receiving conveyor on the way out. A pallet whose bottom boards run parallel to the rollers can drop a board between them. Height matters as well: when one conveyor sits higher than the other, the handoff becomes a small step that the load takes on one edge.
A gravity conveyor is often the receiving side at the end of a powered line, where it is an economical choice. Because it moves product by slope alone, arrival speed depends on the weight of the load and the length of the run. A powered section or a stop ahead of the handoff provides a controlled arrival where the product needs one.
A pop-up transfer conveyor deals with the gap by lifting the load clear of it. Chains or urethane belts rise between the rollers, carry the load sideways, and lower it onto the next line with its orientation unchanged.
Roller layout on both sides of the transfer still matters, since that is where the load sits before and after the lift. Our heavy-duty conveyor guide goes through the roller specifications that set load capacity, including tube diameter, shaft size, and bearing selection.
Pressure From the Product Behind
A transfer takes longer than straight travel. While one load is being lifted, moved, and set down, the next is already arriving, and if the upstream rollers keep turning, the waiting loads press into each other.
That pressure accumulates along the queue. The load at the front carries the push of every load behind it, which is enough to crush carton corners or shove a pallet partway onto a transfer in mid-cycle. A legacy line shaft conveyor adds to it, since one shaft drives every roller in the section and the rollers under a waiting load keep trying to turn.
Zone control deals with the push where it starts: each zone holds one load and runs only when the zone ahead is clear, which keeps waiting loads apart. The transfer then receives one load at a time at a moment the controls choose.
Automotive plants depend on this, since different parts of an assembly line move at different speeds and zero-pressure accumulation is used to pace parts to the line in sequence. The battery tray system we built for an automotive manufacturer runs hundreds of metres of Poly-V MDR with pop-up transfers.

Sensor Timing at a Pop-Up Transfer
A pop-up transfer operates on a signal. Once a sensor confirms the load is in position, the transfer rises, moves the load, and lowers; only then is the following load released. Sensor position therefore determines when the lift starts, and at that moment the load should be stationary and fully over the transfer.
The stop carries much of that. A blade stop or end stop squares the load, so the transfer lifts from the same position on every cycle. Weight carries the rest, since a full container and an empty one of identical size behave differently when the rollers stop. Timing established with one should be verified with the other.
In our automotive bin transfer project, bins from 950 to 1,859 lb moved on CDLR with pop-up chain transfers. That is nearly double the weight through the same equipment. A separate project, moving 3,000-lb steel pallets measuring 47″ by 78″, called for a custom pop-up CDLR.
Where a transfer feeds a robot, its timing becomes part of the cell’s cycle. An earlier post covers how transfer timing and zone control coordinate with robotic cells, and the same handshake applies at any transfer with equipment waiting on it.
Designing Transfers Around the Product
The best way to prevent transfer-related problems is to design the conveyor around the actual products being handled.
Important information includes product dimensions, minimum and maximum weights, bottom surface, centre of gravity, required orientation, throughput, conveyor speed, and whether accumulation is necessary.
From there, the appropriate transfer technology can be selected.
A straightforward end-to-end transfer might only require careful roller spacing. A 90-degree change in direction may benefit from a pop-up transfer conveyor. Heavy pallets may require a dedicated pallet transfer conveyor using a combination of roller and chain conveyor. High-throughput systems may need sophisticated zone control to maintain consistent spacing.
There is rarely a benefit to making a transfer more complicated than necessary. At the same time, saving money by using an overly simple transfer can become expensive if damaged products, jams, and downtime occur every day.
Uneven and Unstable Loads Require Extra Attention
Not every product has a flat, rigid bottom.
Bags, irregular components, damaged cartons, flexible containers, and unusually shaped products can behave unpredictably at conveyor transfer points.
A package with an uneven bottom might travel successfully on a belt conveyor but struggle when transferred onto widely spaced rollers. A tall carton with a high centre of gravity might tip when suddenly accelerated. A loosely wrapped pallet could shift when changing direction.
When recurring product damage on conveyors appears at one specific location, observing exactly how the load behaves through the transfer can often reveal more than inspecting the damaged product afterward.
Is the leading edge dropping?
Is the product rotating?
Does the load suddenly accelerate?
Is one corner contacting the conveyor frame?
Does the following product collide with it?
These details help identify whether the solution involves mechanical changes, controls, speed adjustments, or a different transfer method entirely.
Reading Damage Patterns at Conveyor Transfer Points
The damage usually points to its cause. Logging product damage on conveyors by location as well as by shift shows quickly whether one transfer accounts for it.
Scuffed undersides and loads that lean after the transfer indicate a speed mismatch. Compare the two conveyor speeds, then look at how the load is decelerated before the hand-off. Crushed leading corners or skewed loads mean forward speed is being carried into a stop or side guide, which makes stop position and guide alignment the places to check.
Dented bottom edges, broken pallet boards, and small items tipping come from a gap in support or a height step. Measure roller spacing and relative height at both ends, using the shortest item on the line as the test piece.
Pressure from behind leaves a different mark: crushed cartons in the queue, or loads pushed onto an occupied transfer. The check is whether the upstream rollers stop while the transfer is occupied. Damage that comes and goes with load weight is usually timing, which is tested by running the lightest and heaviest loads past the sensor.
Before changing anything, watch the transfer through a run of cycles with light and heavy loads. Damage that follows one of these patterns usually has a local correction, such as moving a stop or repositioning a sensor. Damage that follows several calls for examining the transfer and the conveyors on either side together.
Practical Conveyor Transfer Troubleshooting Checklist
When product damage, jams, or inconsistent flow keep occurring at the same transfer, a systematic inspection can help identify the cause. Use this checklist while watching actual products move through the system under normal operating conditions.
Product and Load
- Check the smallest and largest products. Make sure every product size has adequate support as it crosses conveyor transfer points.
- Look at the product bottom. Flexible, uneven, damaged, or irregular bottoms may behave differently on rollers than on belts.
- Check product orientation. Determine whether cartons, totes, or pallets become less stable when approaching the transfer in a particular direction.
- Watch the centre of gravity. Tall or top-heavy loads may tip during sudden acceleration, deceleration, or direction changes.
- Inspect pallets. Broken boards, protruding nails, damaged runners, and inconsistent pallet construction can create problems that appear to be conveyor issues.
Mechanical Transfer
- Measure the transfer gap. Look for excessive unsupported space between conveyor sections.
- Check roller spacing. Small products should remain adequately supported as they cross the transfer.
- Inspect elevation differences. Even a small height difference can cause the leading edge of a carton or pallet to strike the receiving conveyor.
- Look for contact points. Check frames, guides, rollers, transfer plates, and stops for marks indicating repeated product contact.
- Inspect guides and rails. Guides should control orientation without squeezing, dragging, or catching products.
- Check for worn components. Damaged rollers, bearings, belts, chains, transfer plates, and other components can contribute to product damage on conveyors.
Speed and Product Flow
- Compare conveyor speeds. Large differences between incoming and outgoing conveyor speeds can cause products to accelerate or decelerate abruptly.
- Watch product spacing. Determine whether trailing products are contacting loads that have not completely cleared the transfer.
- Inspect accumulation areas. Excessive back pressure can damage cartons before they even reach the transfer.
- Check stopping force. Products should not repeatedly crash into mechanical stops at full conveyor speed.
- Observe the transfer at production speed. A system that works during slow testing may behave differently at normal throughput.
Pop-Up Transfers
For a pop-up transfer conveyor, check the complete lift-and-transfer sequence.
- Does the product stop in the correct position before the transfer activates?
- Does the transfer lift the product evenly?
- Is there sufficient clearance above the original conveyor surface?
- Does the product remain stable while changing direction?
- Does the transfer lower completely before the next product arrives?
- Are sensors consistently detecting products in the correct position?
If a pop-up transfer conveyor works intermittently, the issue may involve product positioning or sequencing rather than the transfer mechanism itself.
Pallet Transfers
A pallet transfer conveyor should be inspected with the actual pallet types used in production.
- Confirm that pallet runners and boards are supported throughout the transfer.
- Check whether pallet orientation matches the roller or chain configuration.
- Watch for damaged pallets catching on conveyor components.
- Confirm that the pallet stops in the correct position before changing direction.
- Check for load shifting when the pallet starts or stops.
- Make sure the pallet transfer conveyor is suitable for the heaviest expected pallet, not simply the average load.
Sensors and Zone Control
Proper zone control can prevent many transfer problems that initially appear mechanical.
- Check sensor alignment. Confirm sensors reliably detect every product type.
- Verify release timing. The next product should not enter until the transfer and downstream zone are ready.
- Check zone lengths. Each zone should provide enough room for the products being handled.
- Look for unwanted product contact. Proper zone control should prevent unnecessary collisions during accumulation.
- Test blocked downstream conditions. Confirm products stop in a controlled manner when the next conveyor is unavailable.
- Review sequencing. On automated conveyor transfer points, verify that stops, sensors, transfers, and downstream conveyors activate in the intended order.
Five Questions to Ask at Every Problem Transfer
When diagnosing recurring product damage on conveyors, ask:
- Is the product supported throughout the transfer?
- Does its speed or direction change too abruptly?
- Can another product reach the transfer before the first one clears it?
- Does the product contact anything it shouldn’t?
- Does the problem affect every product, or only certain sizes, weights, orientations, or pallet styles?
The last question can be especially revealing. If only small cartons are damaged, investigate gaps and roller spacing. If damage occurs primarily with heavy pallets, examine stopping forces and the pallet transfer conveyor. If problems appear only during high-volume production, investigate spacing, accumulation, sensors, and zone control.
A useful rule is to change one variable at a time and observe the result. Adjusting conveyor speed, sensor position, guides, stops, and transfer timing simultaneously can make it difficult to determine what actually fixed the problem.
Documenting where and when product damage on conveyors occurs can also reveal patterns. Record the product type, transfer location, operating speed, damage observed, and any abnormal conveyor behaviour. Over time, that information can help distinguish isolated product issues from a recurring problem with the conveyor transfer points.
What to Specify Before the Layout Is Fixed
A transfer is easiest to get right on paper, where moving a stop costs a line on a drawing. At the specification stage, our technical account executives work through a short list of questions with the customer’s engineering team.
The load comes first: the lightest and heaviest weight through the transfer, the shortest footprint, and whether the underside is pallet boards, tote ribs, or a flat base. Flow follows, meaning line speed on both sides, the rate the transfer has to match and the number of loads that can wait ahead of it. We also ask whether the load has to keep its orientation and what is waiting on the other side, whether a robot, an operator, or a forklift.
A pallet transfer conveyor carrying heavy, flat-bottomed loads suits CDLR with pop-up chain transfers, which give positive drive into the stop and a chain lift under the load. Cartons, totes, and trays that need to wait apart suit MDR with zone control and pop-up transfers. Where the load should turn with the line, a turntable changes its direction, and ball transfers let an operator reposition a load by hand at a workstation.
CEMA maintains separate American National Standards for non-powered roller, chain driven live roller, line shaft, and motor driven live roller conveyors. We build to CEMA Standards at our Cambridge facility, and a transfer is the point where two of those conveyor types meet. Matching them to one load is application engineering, and we do it with 3D modelling and a library of thousands of prior designs.
If your line is showing damage at one transfer, or you’re laying out a new one, get in touch with our Cambridge team. Bring the load weights, footprints, and line speeds, and we’ll work through the arrival, the support, and the accumulation ahead of the transfer with you.